Apache, Unicorn & SSL

Having used Apache with Mongrel, Thin and Passenger, I’ve now moved on to Unicorn.  Setting up Apache on Ubuntu to proxy to Unicorn requires the following installation commands:

apt-get install apache2 -y
apt-get install libapache2-mod-proxy-html libxml2-dev -y
a2enmod headers
a2enmod proxy
a2enmod proxy_http
a2enmod proxy_balancer
a2enmod rewrite
a2enmod ssl
/etc/init.d/apache2 restart

With these modules in place a virtual host can be configured something like this:

<VirtualHost *:80>
  ServerName     myhost.example.com
  DocumentRoot   /opt/example/app/public

  RewriteEngine On
  # Redirect all non-static requests to unicorn
  RewriteCond %{DOCUMENT_ROOT}/%{REQUEST_FILENAME} !-f
  RewriteRule ^/(.*)$ balancer://unicornservers%{REQUEST_URI} [P,QSA,L]

  <Proxy balancer://unicornservers>
    Allow from any
    BalancerMember http://127.0.0.1:8080
  </Proxy>
</VirtualHost>

<VirtualHost *:443>
  ServerName     myhost.example.com
  DocumentRoot   /opt/example/app/public

  RewriteEngine On
  # Redirect all non-static requests to unicorn
  RewriteCond %{DOCUMENT_ROOT}/%{REQUEST_FILENAME} !-f
  RewriteRule ^/(.*)$ balancer://unicornservers%{REQUEST_URI} [P,QSA,L]
  RequestHeader set X-Forwarded-Proto "https"

  <Proxy balancer://unicornservers>
    Allow from any
    BalancerMember http://127.0.0.1:8080
  </Proxy>

  SSLEngine     on
  SSLCertificateFile /etc/apache2/ssl/ssl.crt
  SSLCertificateKeyFile /etc/apache2/ssl/ssl.key
</VirtualHost>

mod_headers and the RequestHeader directive are useful if the Rails app is using ssl_requirement.
Using Ruby with Postgres on Ubuntu 10.04 LTS

Installation of PostgreSQL on Ubuntu is straightforward, see http://library.linode.com/databases/postgresql/ubuntu-10.04-lucid

To create a simple database with its own user use the command line:

appenv=myapptst
psql <<EOF
  create user ${appenv} createdb password '*****';
EOF
createdb --username=postgres --owner ${appenv} ${appenv}

To access the database from Rails use pg

gem install pg

Entries in database.yml should look like

development:
  adapter: postgresql
  username: myappstst
  password: mypwd
  database: myapptst

Installing Phusion Passenger on Ubuntu 10.04 LTS

Before installing Phusion Passenger you will need a working installation of Rails:

apt-get install ruby rubygems # distro packages rubygems 1.3.7
gem install rubygems-update
PATH=$PATH:/var/lib/gems/1.8/bin
update_rubygems
gem install rails -v=2.3.4 # or whatever

The Phusion installation script builds an Apache loadable module by linking various libraries. Make sure these libraries are installed before running the script.

apt-get install build-essential ruby1.8-dev libopenssl-ruby
apt-get install apache2 apache2-prefork-dev libapr1-dev libaprutil1-dev
apt-get install libcurl4-openssl-dev

gem install passenger
passenger-install-apache2-module # compilation dependencies satisfied above

The Passenger installation script displays a message to add some lines to your Apache configuration script. One way to do this with Apache2 on Ubuntu is:

cat > /etc/apache2/mods-available/passenger.load <
   LoadModule passenger_module /usr/lib/ruby/gems/1.8/gems/passenger-2.2.15/ext/apache2/mod_passenger.so
   PassengerRoot /usr/lib/ruby/gems/1.8/gems/passenger-2.2.15
   PassengerRuby /usr/bin/ruby1.8
EOF
a2enmod passenger
/etc/init.d/apache2 restart

pgLoader

One of the weaknesses of PostgreSQL compared to Oracle is the lack of a strong bulk loader utility like sqlldr. Natively Postgres offers only the COPY command, which does not include suppport for a bad file and reject log. EnterpriseDB have acknowledged the need for a better tool but it has not been a priority. There is, however, a Python based utility called pgloader available through pgFoundry that wraps COPY and provides a usable bulk loader. Using Python with Postgres requires psycopg2: for Windows an installable package is downloadable from Stickpeople,  for Ubuntu installation can performed with:

apt-get install tcllib libpgtcl-dev python-psycopg2

pgLoader itself is simply a collection of scripts in some folders so download and untar as follows:

wget http://pgfoundry.org/frs/download.php/2294/pgloader-2.3.2.tar.gz
tar zxvf pgloader-*.tar.gz

Building a Tomcat 6 Appliance

TurnKey have done a great job of putting together a collection of open source software appliances using Ubuntu JeOS 8.04.  Unfortunately TurnKey’s Tomcat appliance uses only Tomcat 5.5, instead of Tomcat 6 featuring Servlet 2.5 and JSP 2.1 support, which was released in March 2007.  On the plus side, however, Turnkey have also published their appliance core, which you can use as the basis of your own appliances.  The core includes Webmin at port 12321 and SSH.  Turnkey appliances are distributed with no password for root so make sure to set it as as possible.  The hostname for Turnkey Core is ‘core’, but that can be changed by editing /etc/hostname.

Tomcat 6 has been backported to Ubuntu 8.04, so it is easy to add, just edit /etc/apt/sources.list.d/sources.list and uncomment hardy-backports universe, then:

apt-get update
apt-get install tomcat6 # ~70MB

Note Tomcat6 is run with CATALINA_HOME set to /usr/share/tomcat6 and CATALINA_BASE set to /var/lib/tomcat6. If you read the Tomcat RUNNING.txt doc (available at /usr/share/doc/tomcat6-common/RUNNING.txt.gz) you’ll see that Tomcat6 is looking for libraries in CATALINA_HOME/lib and not CATALINA_BASE/lib. Since it is ignored, the presence of a CATALINA_BASE/lib directory is, at best, confusing.

Tomcat defaults to port 8080 and 8443.  As Tomcat is being run on the appliance as root we can change the ports to 80 and 443 by editing /etc/tomcat6/server.xml.

The tomcat service is managed using /etc/init.d/tomcat6 [start|stop], not bin/shutdown.sh.  Remember to turn off tomcat security or configure it for each application.  Turning off security is done by editing  /etc/init.d/tomcat6 and changing TOMCAT6_SECURITY=no.

There is a tomcat6-admin package also, but I do not use, and have not tested it.  To deploy a war file I simply copy it into /var/lib/tomcat6/webapps, eg.

apt-get install wget
cd /var/lib/tomcat6/webapps
wget http://.../...jar

Installing Oracle XE on Ubuntu

Oracle XE is available for 32-bit architecture (i386) Linux only, although it may be possible to force installation on a 64-bit host. It will run in 512KB RAM but requires a 1GB swap space. Add:

deb http://oss.oracle.com/debian unstable main non-free

to /etc/apt/sources.list and then as root:

wget http://oss.oracle.com/el4/RPM-GPG-KEY-oracle -O- | sudo apt-key add - apt-get update apt-get install oracle-xe

‘libaio’ and ‘bc’ are in the repository, so dependencies will pull them in if the user doesn’t have them.

Subversion on Ubuntu – Multiple Repositories

Eighteen months have passed since I setup Subversion on Ubuntu and I’ve found multiple repositories are valuable for providing finer grained access control and easier storage management. Here is a revised incantation:

su -
adduser --system --home /srv/svnrepos --gecos "System account to run svnserve" svn
apt-get install subversion xinetd
cat >> /etc/xinetd.d/svn << "EOF"
service svn
{
        port                    = 3690
        socket_type             = stream
        protocol                = tcp
        wait                    = no
        user                    = svn
        server                  = /usr/bin/svnserve
        server_args             = -i -r /srv/svnrepos
}
EOF
/etc/init.d/xinetd restart

# for each repository, eg. myrepo1
$repo=myrepo1
svnadmin create /srv/svnrepos/$repo
chown -R svn:nogroup /srv/svnrepos

# uncomment line to use default password file
vi ~svn/$repo/conf/svnserve.conf

cat >> ~svn/$repo/conf/passwd << "EOF"
[users]
fred = *****
...

Installing Subversion on Ubuntu

There are many ways to do it, but this incantation worked for me on an Ubuntu host. This is an ‘entry level’ setup with one repository and simple authentication. Read the Subversion book and Ubuntu documentation to understand.

su -
apt-get install subversion
adduser --system --home /srv/svn --gecos "System account to run svnserve" svn
svnadmin create /srv/svn
chown -R svn:nogroup /srv/svn

apt-get install xinetd
cat >> /etc/xinetd.d/svn << "EOF"
service svn
{
        port                    = 3690
        socket_type             = stream
        protocol                = tcp
        wait                    = no
        user                    = svn
        server                  = /usr/bin/svnserve
        server_args             = -i -r /srv/svn
}
EOF
/etc/init.d/xinetd restart

# uncomment line to use default password file (~svn/conf/passwd)
vi ~svn/conf/svnserve.conf

cat >> ~svn/conf/passwd << "EOF"
[users]
fred = *****
...
EOF
chmod 600 ~svn/conf/passwd

Installing Ubuntu Server 8.04 LTS Using LVM

The installation ISO for 8.04 LTS Server can be downloaded from http://www.ubuntu.com/getubuntu/download-server

Ubuntu 8.04 was released in April 2008 and will be supported until April 2013. The 64bit version is recommended.

I installed Ubuntu Server on a VM with a 2GB drive and 512MB RAM.

The default hostname given during the install is ‘ubuntu’. Be sure to change it to something more distinct.

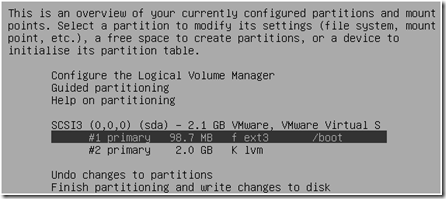
The installation offers LVM, and even encrypted LVM, but if you select them it does not actually install the O/S on an LVM partition. For that you have to enter manual partitioning. I created a 100MB ext3 /boot partition (GRUB does not support booting from an LV) and allocated the rest of the drive to a PV. ubuntu-install-partitions

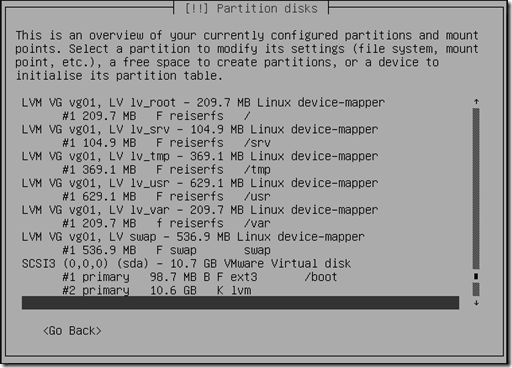
Once the two disk partitions are created you can configure the Logical Volume Manager.  Allocate LVs for the various filesystems: at least 200MB each for / and /var and 250 MB for /usr (installing VMware tools requires more disk storage, a 350MB /tmp to untar the installation bundle and 600MB /usr).  I like using multiple separate filesystems because it reduces the risk that a runaway process will consume all available storage and render the system unavailable.  Using LVM helps make multiple filesystems manageable because it becomes much easier to extend a filesystem when you need to.

Ubuntu-LVM-partitions 

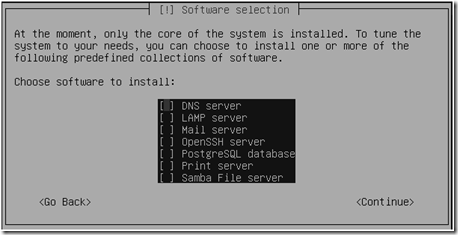
Ubuntu Server installation offers a minimal menu of packages to install.  I chose OpenSSH (OpenBSD Secure Shell) and PostgreSQL (v.8.3).  UFW is installed, but not enabled by default.ubuntu-install-packages

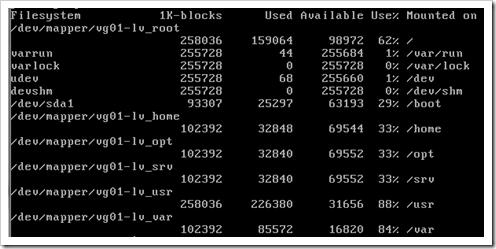
After installation my filesystem utilization looked like this.  ubuntu-install-df

To extend LVM based filesystems see http://tldp.org/HOWTO/LVM-HOWTO/extendlv.html, eg.

lvcreate --size 150M --name lv_tmp vg01
mkfs.reiserfs --label tmp /dev/vg01/lv_tmp

lvextend -L+100M /dev/vg01/lv_tmp
resize_reiserfs -f /dev/vg01/lv_tmp
Scroll to top