Populating an Oracle tablespace

Suppose that we want to move all the mid-size indexes for a given schema FOO, into their own tablespace. First, let’s list them all:

  SELECT   ext.owner, index_name, SUM (bytes) / (1024 * 1024) MB
    FROM      dba_extents ext
           JOIN
              dba_indexes idx
           ON idx.owner = ext.owner AND idx.index_name = ext.segment_name
   WHERE       ext.owner = 'FOO'
           AND segment_type = 'INDEX'
           AND index_type = 'NORMAL'
GROUP BY   ext.owner, index_name
  HAVING   SUM (bytes) / (1024 * 1024) > 8
ORDER BY   MB DESC

How large does the tablespace need to be?

  SELECT   1.25 * SUM (bytes) / (1024 * 1024) MB
    FROM      dba_extents ext
           JOIN
              dba_indexes idx
           ON idx.owner = ext.owner AND idx.index_name = ext.segment_name
   WHERE       ext.owner = 'FOO'
           AND segment_type = 'INDEX'
           AND index_type = 'NORMAL'
ORDER BY   MB DESC

To populate the tablespace we could use:

  SELECT   'alter index '||ext.owner||'.'||segment_name||' rebuild tablespace '||:new_ts||';'
    FROM      dba_extents ext
           JOIN
              dba_indexes idx
           ON idx.owner = ext.owner AND idx.index_name = ext.segment_name
   WHERE       ext.owner = 'FOO'
           AND segment_type = 'INDEX'
           AND index_type = 'NORMAL'
GROUP BY   ext.owner, segment_name, segment_type
  HAVING   SUM (bytes) / (1024 * 1024) > 8
ORDER BY   SUM (bytes) / (1024 * 1024) DESC

Now suppose we want to move all tables (including index organized) for a given schema FOO into their own tablespace. To list them:

  SELECT   owner, table_name, SUM (bytes) / (1024 * 1024) MB
    FROM   (SELECT   ext.owner, table_name, bytes
              FROM      dba_extents ext
                     JOIN
                        dba_tables tbl
                     ON tbl.owner = ext.owner AND table_name = ext.segment_name
             WHERE   ext.owner = 'FOO'
            UNION ALL
            SELECT   ext.owner, table_name, bytes
              FROM      dba_extents ext
                     JOIN
                        dba_indexes idx
                     ON idx.owner = ext.owner
                        AND idx.index_name = ext.segment_name
             WHERE       ext.owner = 'FOO'
                     AND segment_type = 'INDEX'
                     AND index_type = 'IOT - TOP')
GROUP BY   owner, table_name, bytes
  HAVING   SUM (bytes) / (1024 * 1024) > 8
ORDER BY   MB DESC;

How large does the tablespace need to be?

  SELECT   1.25 * SUM (bytes) / (1024 * 1024) MB
    FROM   (SELECT   ext.owner, table_name, bytes
              FROM      dba_extents ext
                     JOIN
                        dba_tables tbl
                     ON tbl.owner = ext.owner AND table_name = ext.segment_name
             WHERE   ext.owner = 'FOO'
            UNION ALL
            SELECT   ext.owner, table_name, bytes
              FROM      dba_extents ext
                     JOIN
                        dba_indexes idx
                     ON idx.owner = ext.owner
                        AND idx.index_name = ext.segment_name
             WHERE       ext.owner = 'FOO'
                     AND segment_type = 'INDEX'
                     AND index_type = 'IOT - TOP')

To populate the tablespace we could use:

SELECT      'alter table '|| owner|| '.'|| table_name
         || ' move tablespace '|| :new_ts|| ';'
  FROM   (SELECT   owner, table_name
            FROM   dba_tables tbl
           WHERE   owner = 'FOO'
          UNION ALL
          SELECT   owner, table_name
            FROM   dba_indexes idx
           WHERE   owner = 'FOO' AND index_type = 'IOT - TOP')

SELECT   'alter index ' || owner || '.' || index_name || ' rebuild;'
  FROM   dba_indexes
 WHERE   owner = 'FOO' AND status = 'UNUSABLE'
VMware Timekeeping


A hopelessly inaccurate timeclock on my SLES host has been driving me nuts. I eventually found the relevant VMware white paper and used Virtual Center to set the ‘Advanced’ option to ‘Synchronize guest time with host’:

I also modified /boot/grub/menu.lst to add ‘clock=pit’ as an argument to the kernel invocation. Both changes required a reboot of the VM, but at least the issue is resolved now. Why on earth isn’t this option set by default?

CruiseControl and Subversion

Getting started with CruiseControl is relatively straightforward, see http://confluence.public.thoughtworks.org/display/CC/Getting+Started+With+CruiseControl

To place an application on CruiseControl it should have an Ant script to build it. The application Ant script does not need to interact with Subversion. The source for the application including the Ant script should be checked into Subversion.

I started to install CruiseControl by downloading and compiling the source, but my version of ant was too old. Instead I downloaded the binary (which ironically includes a newer ant also):

su -
wget http://downloads.sourceforge.net/cruisecontrol/cruisecontrol-bin-2.7.2.zip
unzip -d /opt cruisecontrol-bin-2.7.2.zip

useradd --system --home /srv/cruisecontrol --create-home --gecos "System account to run CruiseControl" cruise
usermod -s /bin/ksh cruise
su – cruise
mkdir checkout logs artifacts
PATH=$PATH:/opt/subversion-1.3.2/bin/:/opt/cruisecontrol-bin-2.7.2
cruisecontrol.sh

Now we need to configure CruiseControl to monitor the Subversion repository. Create config.xml:


Build-myproj.xml contains Ant steps to checkout a clean copy of the application and build it:

To setup the dashboard, running at :8080

su - cruise cp /opt/cruisecontrol-bin-2.7.2/dashboard-config.xml . kill `cat cc.pid` cruisecontrol.sh

Installing Subversion on Ubuntu

There are many ways to do it, but this incantation worked for me on an Ubuntu host. This is an ‘entry level’ setup with one repository and simple authentication. Read the Subversion book and Ubuntu documentation to understand.

su -
apt-get install subversion
adduser --system --home /srv/svn --gecos "System account to run svnserve" svn
svnadmin create /srv/svn
chown -R svn:nogroup /srv/svn

apt-get install xinetd
cat >> /etc/xinetd.d/svn << "EOF"
service svn
{
        port                    = 3690
        socket_type             = stream
        protocol                = tcp
        wait                    = no
        user                    = svn
        server                  = /usr/bin/svnserve
        server_args             = -i -r /srv/svn
}
EOF
/etc/init.d/xinetd restart

# uncomment line to use default password file (~svn/conf/passwd)
vi ~svn/conf/svnserve.conf

cat >> ~svn/conf/passwd << "EOF"
[users]
fred = *****
...
EOF
chmod 600 ~svn/conf/passwd

Installing Ubuntu Server 8.04 LTS Using LVM

The installation ISO for 8.04 LTS Server can be downloaded from http://www.ubuntu.com/getubuntu/download-server

Ubuntu 8.04 was released in April 2008 and will be supported until April 2013. The 64bit version is recommended.

I installed Ubuntu Server on a VM with a 2GB drive and 512MB RAM.

The default hostname given during the install is ‘ubuntu’. Be sure to change it to something more distinct.

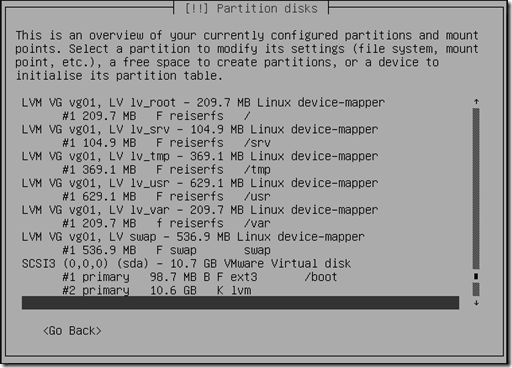
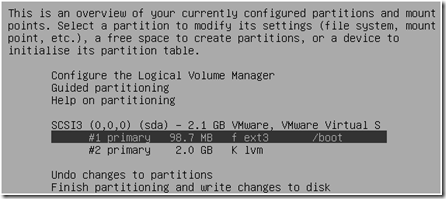
The installation offers LVM, and even encrypted LVM, but if you select them it does not actually install the O/S on an LVM partition. For that you have to enter manual partitioning. I created a 100MB ext3 /boot partition (GRUB does not support booting from an LV) and allocated the rest of the drive to a PV. ubuntu-install-partitions

Once the two disk partitions are created you can configure the Logical Volume Manager.  Allocate LVs for the various filesystems: at least 200MB each for / and /var and 250 MB for /usr (installing VMware tools requires more disk storage, a 350MB /tmp to untar the installation bundle and 600MB /usr).  I like using multiple separate filesystems because it reduces the risk that a runaway process will consume all available storage and render the system unavailable.  Using LVM helps make multiple filesystems manageable because it becomes much easier to extend a filesystem when you need to.

Ubuntu-LVM-partitions 

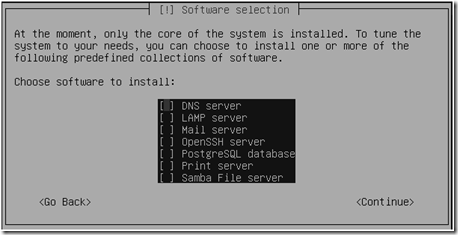
Ubuntu Server installation offers a minimal menu of packages to install.  I chose OpenSSH (OpenBSD Secure Shell) and PostgreSQL (v.8.3).  UFW is installed, but not enabled by default.ubuntu-install-packages

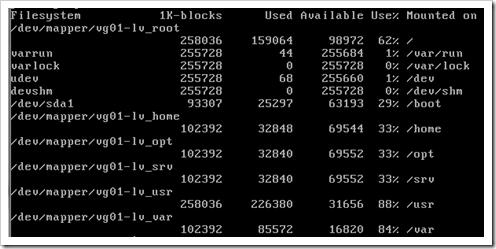
After installation my filesystem utilization looked like this.  ubuntu-install-df

To extend LVM based filesystems see http://tldp.org/HOWTO/LVM-HOWTO/extendlv.html, eg.

lvcreate --size 150M --name lv_tmp vg01
mkfs.reiserfs --label tmp /dev/vg01/lv_tmp

lvextend -L+100M /dev/vg01/lv_tmp
resize_reiserfs -f /dev/vg01/lv_tmp

Struts Guidelines

Struts (or more correctly, the Struts Action Framework) is probably the most successful Java web-application framework to date. It enables organization of Java web-applications using a model-view-controller (MVC) approach that makes it easier to write and maintain non-trivial applications.

The framework comprises

  • A front controller servlet (ActionServlet) that accepts, processes, and routes all incoming HTTP requests in accordance with a configuration file (struts-config.xml)

  • RequestProcessor and Action classes that can be extended and customized with application logic.

  • A set of JSP tag libraries (html, bean, logic, tiles) to simplify building forms and displaying output.

  • Support for populating HTML form input into regular or dynamic beans (DynaBeans).

  • Support for validating input and displaying error messages (ActionErrors, ApplicationResources.properties)

The version of Struts shipped with JDeveloper 10.1.2 was 1.1. A number of books have been written about this version, see the Apache Struts 1.1 Project Home Page. Using 1.2 should not be a significant problem, but it does not include compelling enhancements. Note Struts 1.1 includes Commons BeanUtils 1.6.

JSPs

  • Organize applications into pages, eg. CustomerSearch.jsp, CustomerView.jsp, CustomerEdit.jsp.

  • Follow the Oracle Browser Look And Feel (BLAF) guidelines for all corporate applications, see the Oracle Browser Look and Feel (BLAF) Guidelines. Use the blaf.css provided with JDeveloper, do not modify it.  Use the icons from the BLAF icon repository.

  • Place all JSPs into the WEB-INF directory, where they cannot be invoked directly. Provide a start.jsp in the public web root directory that forwards to a Struts action to start the application. Set start.jsp as the welcome file in web.xml.

  • Refrain from adding scriplets to JSPs as far as possible: place code in the corresponding Java class and use Struts :bean tags to display results in the JSP.

Action Classes

  • For each JSP create a corresponding Java class that extends DispatchAction and which handles requests from the JSP.

  • Use DynaActionForms to capture form input. These are configured in struts-config.xml, eliminating the need to write Java bean classes for each input form.

  • Validate all input on the server side. Although JavaScript can be used on the client for added responsiveness, client side validation can always be bypassed or disabled.

  • Do not place database access code into JSPs or Action classes: factor out this code into separate data access objects (DAOs). Configure data sources using the servlet container, not the (deprecated) struts-config.xml option. Name data sources after the username or schema used for the connection, not the target database instance.

Error Handling

  • Write error diagnostic and tracing information to the servlet context log, do not simply print a stack trace.  This may be done by extending struts.action.RequestProcessor.

  • Declare error pages in web.xml to handle unexpected server errors (500) and missing resources (404).  It may be convenient to comment these out in development environments.

  • Review Ambysoft’s Coding Standards for Java

  • At a minimum use an initial capital for classes and an initial lower case for variables. Use all caps only for constants, ie. where ‘static final’ is used.

  • Do not declare global variables: at a minimum use singleton beans. Global constants are OK.

References

Insourcing vs. outsourcing

Reasons to outsource:

  • The business is growing rapidly and leveraging an existing third party infrastructure is quicker/less risky than building/scaling one’s own. In this case it is worth paying a premium for the infrastructure, which is more than offset by the value to stakeholders of growing the business rapidly with less IT risk. The key aspect here is, speed to market.
  • A third party has knowledge, skills, or some other limited resource that the business wants to leverage, and paying a premium to a third party makes more sense than acquiring the resource using internal staff. The key aspect here is non-core specialization.
  • A third party is able to subdivide a pool of resources between multiple clients and thereby deliver a service more cheaply than individual clients could do so on their own. This is economy of scale, and provided some of these economies are shared with clients it will never make sense for the business to insource.
  • Even if the above aspects do not apply management may lack clear visibility or confidence in internal processes, and may choose to outsource an IT service using a negotiated contract to a separate organization for financial discipline and control.

Reasons to insource:

  • Outsourcing requires more formal agreements between organizations and ongoing efforts to ensure goals are mutually aligned. Hence, if there is no compelling reason to outsource then insourcing requires less management overhead.
  • An IT process may be intimately related to an innovative business process or product that is a source of competitive advantage. In this case stakeholders may want this knowledge kept in house, and in any case it may be of limited value to a third party to acquire this knowledge on the business’s behalf: this is core specialization.
  • Third parties may be unwilling or unable to indemnify the business against certain risks, for example theft of sensitive customer data. More generally insourcing may be considered the most practical response to certain legal concerns.

Insourcing/outsourcing should not be confused with asset ownership, and in particular intellectual property rights and licences. It may make sense to outsource certain processes, while seeking to own related assets.

SUSE LVM and Oracle Database

One of the reasons I like deploying Oracle Database on SLES is that SuSE Linux includes LVM by default. Having become accustomed to LVM implementations on HP-UX and AIX I was disappointed to discover it was not a standard feature of all Linux distros. An extensive LVM guide is available at the Linux Documentation Project. Jeff Hunter’s site has some notes and a copy of a good early white paper on SuSE LVM

To list all volume groups, physical volumes and logical volumes

vgs lvs pvs

To initialize a blank disk and make it an LVM physical volume (PV):

pvcreate /dev/sdx 

To display the details of a physical volume:

pvdisplay /dev/sdx

To create a volume group containing a physical volume:

vgcreate vg01 /dev/sdx

To add a physical volume to an existing VG:

vgextend vg01 /dev/sdy

To display the details of the volume group:

vgdisplay

To create an LVM logical volume:

lvcreate --size 2050m --name lv_sls_idx_128m00 vg01

To move physical extents from one PV to another in a VG. Requires LVs not in use.

pvmove /dev/hdb /dev/sdf

The SuSE white paper also discusses (pp.20+) how to map an LV to a raw device suitable as an Oracle datafile. On a properly tuned host this should result in better performance. More importantly, in my opinion, it reduces the need to allocate, resize and monitor host filesystems for Oracle data. The simplest approach is to use raw. Given that mappings are not persistent it is best to script them in /etc/init.d/boot.local.

/usr/sbin/raw /dev/raw/raw128 /dev/vg01/lv_sls_idx_128m00
chown oracle:dba /dev/raw/raw128

Once the device is mapped it can be added to a tablespace like this:

CREATE TABLESPACE sls_idx_128m DATAFILE '/dev/raw/raw128' SIZE 2050M EXTENT MANAGEMENT LOCAL UNIFORM SIZE 128M;

More readable device names can be created like this:

rm -f /dev/raw/raw131
mknod /dev/raw/rlv_sls_dat_4m00.dbf c 162 131
raw /dev/raw/rlv_sls_dat_4m00.dbf /dev/vg01/lv_sls_dat_4m00
chown oracle:dba /dev/raw/rlv_*.dbf 

Tablespaces can then be created like this:

CREATE TABLESPACE sls_dat_4m DATAFILE '/dev/raw/rlv_sls_dat_4m00.dbf' SIZE 2050M EXTENT MANAGEMENT LOCAL UNIFORM SIZE 4M;

Posts navigation

1 2 3 9 10 11 12
Scroll to top